Why You’ll Love This Recipe
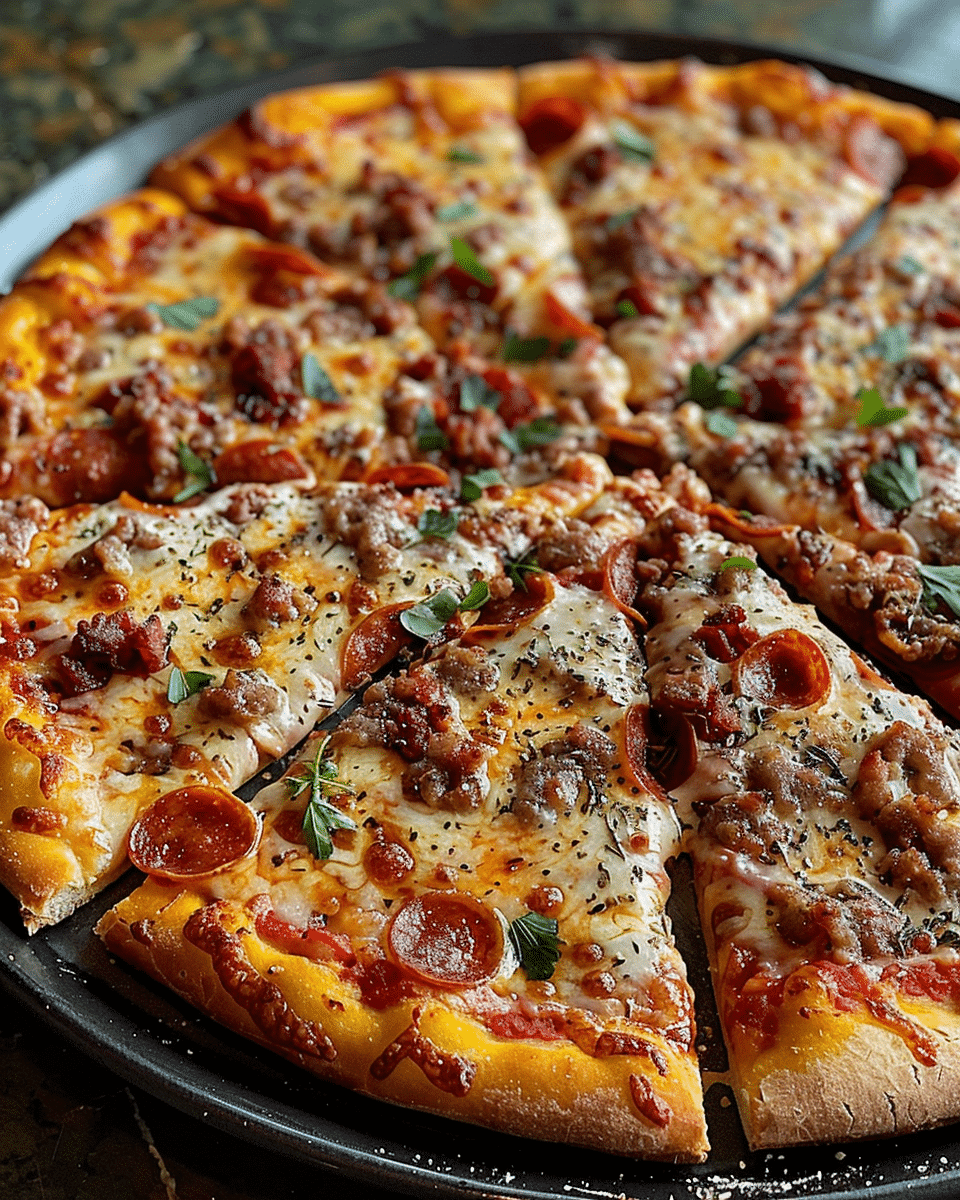
Chicago Thin Crust Pizza is beloved for several reasons. The thin, crispy crust is baked to a perfect golden brown, offering a satisfying crunch with every bite. Paired with a tangy, herb-forward tomato sauce, melty mozzarella cheese, and hearty toppings like sausage and pepperoni, this pizza offers bold flavors in every bite. The signature square slices are perfect for sharing, making it a great option for parties or family dinners. Additionally, the pizza bakes quickly, making it a convenient choice for busy weeknights when you crave a delicious homemade meal.
Ingredients
For the Crust:
-
2¼ tsp (1 packet) active dry yeast
-
1 tsp sugar
-
¾ cup warm water (110°F/43°C)
-
2 cups all-purpose flour
-
1 tsp salt
-
2 tbsp olive oil
For the Sauce:
-
1 cup crushed tomatoes
-
1 tsp dried oregano
-
½ tsp garlic powder
-
½ tsp onion powder
-
½ tsp sugar
-
Salt and pepper to taste
Toppings (Customizable):
-
2 cups shredded mozzarella (low moisture)
-
½ cup Italian sausage (cooked and crumbled)
-
½ cup pepperoni slices
-
¼ cup green bell pepper, thinly sliced
-
Optional: mushrooms, onions, black olives, or giardiniera
(Tip: You’ll find the full list of ingredients and measurements in the recipe card below.)
Directions
-
Make the Dough
In a small bowl, combine yeast, sugar, and warm water. Let sit for 5–10 minutes until foamy.
In a large mixing bowl, stir together flour and salt. Add yeast mixture and olive oil. Mix until a rough dough forms.
Knead for 5–7 minutes until smooth and elastic. Place in an oiled bowl, cover, and let rise for 1 hour or until doubled. -
Prepare the Sauce
While the dough rises, mix crushed tomatoes with oregano, garlic powder, onion powder, sugar, and salt in a bowl. Adjust seasoning to taste. Set aside. -
Roll Out and Preheat
Preheat oven to 475°F (245°C).
Punch down the dough and roll it out very thin (about ⅛ inch) on a floured surface. Transfer to a parchment-lined baking sheet or pizza stone. -
Assemble the Pizza
Spread a thin layer of sauce evenly across the dough. Add a generous amount of shredded mozzarella, then layer on your toppings. -
Bake
Bake for 12–15 minutes or until the edges are golden and the cheese is bubbling and browned. -
Slice and Serve
Remove from oven, let cool slightly, then cut into squares (tavern-style). Serve hot and crispy.
Servings and Timing
-
Prep Time: 20 minutes
-
Resting Time (Dough): 1 hour
-
Bake Time: 12–15 minutes
-
Total Time: ~1 hour 45 minutes
-
Yield: 1 large pizza (10–12 square slices)
Variations
Chicago Thin Crust Pizza is versatile, allowing you to get creative with your toppings. Here are some variations to try:
-
Veggie Delight: Load up with mushrooms, green peppers, onions, and black olives for a colorful, vegetarian version.
-
Spicy Sausage: For extra heat, swap regular Italian sausage with spicy sausage or add a few dashes of hot sauce.
-
Cheese Lovers: Add a mix of mozzarella, provolone, and Parmesan for an extra cheesy experience.
-
Meat Feast: Top with a combination of sausage, pepperoni, and even anchovies for a hearty meat lover’s pizza.
Storage/Reheating
To store leftover pizza, let it cool completely and then wrap it tightly in plastic wrap or aluminum foil. Store it in the refrigerator for up to 3 days. When ready to eat, reheat slices in a preheated oven at 375°F (190°C) for about 5–7 minutes to restore the crispness of the crust. Alternatively, you can reheat individual slices in a skillet over medium heat for a few minutes.
FAQs
1. Can I use gluten-free flour for the crust?
Yes, you can use a gluten-free all-purpose flour blend. Make sure to check that your yeast is also gluten-free.
2. How can I make the crust even crispier?
For an extra crispy crust, you can brush the edges with olive oil before baking or bake the pizza on a pizza stone.
3. Can I freeze the dough?
Yes, you can freeze the dough. After the dough rises, punch it down and shape it into a ball. Wrap it in plastic wrap and store it in a freezer bag for up to 3 months. Let it thaw in the refrigerator overnight before using.
4. Can I use store-bought pizza sauce?
Yes, store-bought pizza sauce works fine if you’re in a hurry, but making your own sauce adds a personal touch to the recipe.
5. How do I know when the pizza is done?
The pizza is done when the edges are golden and crispy, and the cheese is bubbling and slightly browned.
6. Can I use a different type of cheese?
Yes, feel free to experiment with different cheeses such as provolone, cheddar, or a blend of mozzarella and Parmesan for a different flavor profile.
7. Can I make this pizza ahead of time?
Yes, you can prep the dough and sauce in advance. Store them in the fridge for up to 24 hours and assemble and bake the pizza when you’re ready to serve.
8. What’s the difference between Chicago Thin Crust and other thin-crust pizzas?
Chicago Thin Crust Pizza is known for its cracker-like crispiness, whereas other thin crusts may be a bit chewier. Additionally, Chicago-style is typically cut into squares rather than wedges.
9. Can I add more toppings?
Absolutely! Feel free to customize the toppings to suit your preferences. Just keep in mind that too many toppings can make the crust soggy.
10. Can I use a pre-made pizza crust?
Yes, you can use a store-bought crust if you’re short on time. Just roll it out thin and follow the rest of the recipe.
Conclusion
Chicago Thin Crust Pizza offers a perfect balance of crispy, cheesy, and flavorful goodness. Its light, crunchy crust and generous toppings make it an excellent choice for anyone craving a satisfying pizza. Whether you’re making it for a casual dinner or a gathering, this pizza is sure to impress. With its quick baking time and customizable toppings, it’s easy to see why Chicago Thin Crust has become a favorite among pizza lovers. Try this recipe today and enjoy a slice of Midwest magic!

Chicago Thin Crust Pizza: A Crispy, Cheesy Slice of Midwest Magic
5 Stars 4 Stars 3 Stars 2 Stars 1 Star
No reviews
Chicago Thin Crust Pizza offers a crispy, cheesy slice with a cracker-thin base, zesty sauce, and generous toppings. Known for its golden brown edges and signature square slices, this pizza style is perfect for parties and gatherings, delivering bold flavors with every bite.
- Total Time: ~1 hour 45 minutes
- Yield: 1 large pizza (10–12 square slices)
Ingredients
2¼ tsp (1 packet) active dry yeast
1 tsp sugar
¾ cup warm water (110°F/43°C)
2 cups all-purpose flour
1 tsp salt
2 tbsp olive oil
1 cup crushed tomatoes
1 tsp dried oregano
½ tsp garlic powder
½ tsp onion powder
½ tsp sugar
Salt and pepper to taste
2 cups shredded mozzarella (low moisture)
½ cup Italian sausage (cooked and crumbled)
½ cup pepperoni slices
¼ cup green bell pepper, thinly sliced
Optional: mushrooms, onions, black olives, or giardiniera
Instructions
- In a small bowl, combine yeast, sugar, and warm water. Let sit for 5–10 minutes until foamy.
- In a large mixing bowl, stir together flour and salt. Add yeast mixture and olive oil. Mix until a rough dough forms.
- Knead for 5–7 minutes until smooth and elastic. Place in an oiled bowl, cover, and let rise for 1 hour or until doubled.
- While the dough rises, mix crushed tomatoes with oregano, garlic powder, onion powder, sugar, and salt in a bowl. Adjust seasoning to taste. Set aside.
- Preheat oven to 475°F (245°C).
- Punch down the dough and roll it out very thin (about ⅛ inch) on a floured surface. Transfer to a parchment-lined baking sheet or pizza stone.
- Spread a thin layer of sauce evenly across the dough. Add a generous amount of shredded mozzarella, then layer on your toppings.
- Bake for 12–15 minutes or until the edges are golden and the cheese is bubbling and browned.
- Remove from oven, let cool slightly, then cut into squares (tavern-style). Serve hot and crispy.
Notes
Store leftovers in the refrigerator for up to 3 days. Reheat in a preheated oven or on the stovetop for best results.
Experiment with different toppings like mushrooms, onions, or giardiniera to customize your pizza.
Freeze dough after rising for up to 3 months, then thaw in the refrigerator overnight.
- Author: Chloe Mae
- Prep Time: 20 minutes
- Cook Time: undefined
- Category: Dinner
- Method: Oven
- Cuisine: American
Nutrition
- Serving Size: 1 square slice (out of 12)
- Calories: 280
- Sugar: 4g
- Sodium: 450mg
- Fat: 15g
- Saturated Fat: 6g
- Unsaturated Fat: 7g
- Trans Fat: 0g
- Carbohydrates: 30g
- Fiber: 2g
- Protein: 10g
- Cholesterol: 25mg


